
Embed the Full Visier Application
Learn how to embed the full Visier application in your solution.
Overview
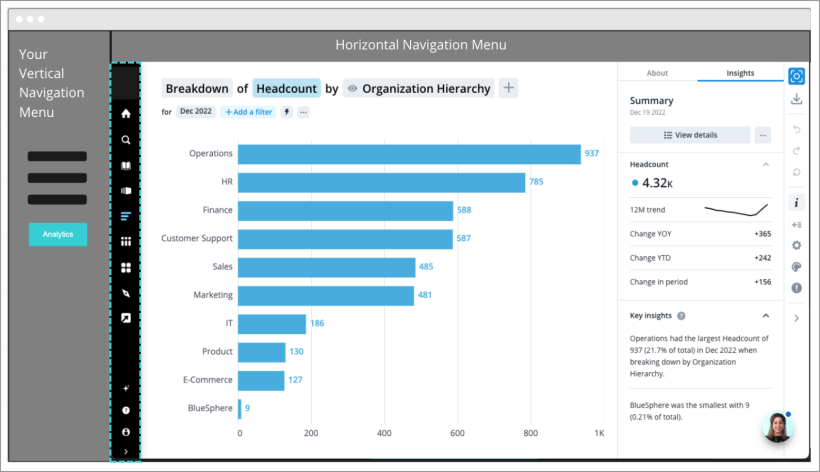
You can embed the full Visier application in your solution using an iframe, as shown in the following screenshot.
Tip:
- To access a mock web application that embeds Visier for an analytic tenant, please visit Visier's Embedding Exemplar. To integrate with Visier using the embedding exemplar, you must set up single sign-on for your analytic tenants. For more information, see Set up single sign-on for your analytic tenants.
- To embed Visier Compensation Benchmarks, see Embed Compensation Benchmarks.
To understand the navigation experience, you must first understand that Visier organizes content into sections and rooms. A section is a high-level container with multiple rooms such as the solution experience or Studio. A room is a specific content container; for example, the solution experience contains the Guidebooks, Explore, and Analyses rooms. In this article, you will learn how to embed Visier with a hidden iframe and how to render rooms on the Visier navigation bar.
You should be familiar with the following terms to understand this article:
- Visier App Server: The server that hosts the Visier solution. This is the interface that your users see while using Visier in your application.
- Visier Login Server: The server that hosts Visier's login interface. This is how your users access the platform.
- Administrating tenant: A tenant that manages one or more analytic tenants. Administrating tenants are capable of creating further analytic tenants and navigating to existing analytic tenants to support them.
- Analytic tenant: A tenant that represents an organization's Visier instance. Each of your customers has their own analytic tenant with a unique code and a user-friendly display name.
- Production tenant: The final version of the software that's made available to end users. The production tenant supports the project workflow so you can test changes without impacting production tenants, such as content changes, data mappings, and ETL changes.
- Integration tenant: A copy of your production tenant. You can use an integration tenant to test workflows without impacting the production tenants, such as automation, data transfers, and application integration.
Additionally, this article assumes that you already created users in Visier and assigned security permissions to users. For more information, see User Management and Permission Management.
The following list outlines the high-level steps to embed Visier in your organization.
- Add Visier's embedding script to the page in which you want to embed Visier.
- On the page in which you want to embed Visier, add an iframe and assign the iframe an ID.
Note: You can optionally embed multiple full application iframes on the same page, such as to embed Guidebooks in one iframe and Vee in a different iframe.
- Render Visier in your application. First, retrieve Visier's rooms (application sections) and then decide which of the returned rooms to embed in your application. You can optionally:
- Specify the landing page in the embedded Visier app.
- Add links on your navigation bar to the embedded Visier app. You can add Visier navigation links to your navigation bar to allow your users to navigate to different Visier rooms; for example, Explore or Compare.
- Handle Visier sessions in your application, such as alignment between sessions in your application and in Visier, and session exceptions that may occur.
- Configure a click-through link so that users are redirected into your application after clicking a Visier hyperlink, such as a shared analysis or embedded visualization.
- Set up event handling/listeners so that you can handle events or errors like invalid visualizations or missing analyses.
- Set up uptime monitoring to spot an outage in a timely manner.
The above steps are described in more detail in this article.
Tip: We recommend that you validate in a pre-production environment using your partner integration tenant before integrating with the production tenant.
Prerequisites
There are a few steps you must take before you can start integrating Visier into your solution, as described next.
- Add trusted domains to the embeddable domains list. Each addition requires a secure domain using Hypertext Transfer Protocol Secure (https). For more information, see Add Your Domain to the Embeddable Domains List.
- Enable single sign-on. For more information, see Set Up Single Sign-On.
Single sign-on allows Visier to correctly validate SAML assertions associated with the integration.
- Set up the identity provider (IdP) server. For more information, see What is an identity provider (IdP). Additionally, you can view the following example of IdP setup: How to perform IdP-initiated SSO to a Service Provider when PingFederate is the IdP.
The IdP server stores and manages digital identities. Visier's single sign-on mechanism uses your IdP to check user identity but does not store identity.
- In your Chrome browser, turn off Bypass for network. To turn off Bypass for network, open Chrome DevTools and navigate to Application > Service Workers, then turn off Bypass for network.
After you complete the prerequisites, you can start the technical development to integrate Visier into your solution.
Note: Before embedding Visier in your application, review Visier's Supported Browsers and System Requirements.
Step One: Add Visier's embedding script to your target page
On the page in which you want to embed the Visier application, add the below script. The script downloads Visier's embedding SDK and makes Visier's embedding API available through a visier function. For example, use the API to keep the Visier session alive with visier("trigger", "PARENT_SESSION_ALIVE").
Note:
- In the script, you can use the
visierConfigobject to configure the embedded Visier application. For more information aboutvisierConfig, see visierConfig fields. - Before running the script, replace the placeholder text with your unique values, such as your unique
visierUrlandidpUrl. -
We recommend that you only use a single instance of the sdk.v2.js file. The SDK is designed to handle a single instance, so using multiple instances may lead to unexpected results. With a single instance, you’ll get the best performance because the SDK only initializes once. Plus, you only have to manage a single session which makes usage tracking easier.
- For more information about Visier's embedding SDK, see SDK file history.
- For more methods you can use with the
visierfunction, see Embedding API Methods.
// Declare the visierConfig
const visierConfig = {
    visierUrl: "https://example.visier.com/hr",
    idpUrl: "https://idp.example.com" // The idpUrl must point to the endpoint that automatically posts a SAML assertion to Visier.
};

// Add a script element pointing to the SDK and make its public functions available.
(function(w, d, t, s, c, v, e, x) {
    w['VisierEmbedder'] = v;
    w[v] = w[v] || function() {
        (w[v].q = w[v].q || []).push(arguments)
    };
    if (!d.getElementById(s)) {
        // Add the script if it was not already added before.
        e = d.createElement(t);
        x = d.getElementsByTagName(t)[0];
        e.id = s;
        e.async = true;
        e.src = c.visierUrl ? c.visierUrl + s : (c.loginUrl ? c.loginUrl.split("/auth/embedded")[0] + s : s);
        x.parentNode.insertBefore(e, x);
    }
})(window, document, 'script', '/assets/embedded/webAssets/sdk.v2.js', visierConfig, 'visier');

// Bootstrap the SDK with the visierConfig.
visier('bootstrap', visierConfig);
visierConfig fields
The following fields in the visierConfig code snippet allow you to handle the embedded Visier application.
| Field | Description | Type | Required | Notes | |
|---|---|---|---|---|---|
| visierUrl | The URL that handles the automatic login workflow that triggers a SAML authentication request when loading the embedded visual. Visier uses this URL to download the sdk.v2.js file. |
string |
Required |
|
|
|
loginUrl (Deprecated) |
The URL that handles the automatic login workflow that triggers a SAML authentication request when loading the embedded visual. | string | Required | Deprecated. Use visierUrl. |
|
| idpUrl |
The IdP URL that handles hidden sessions. This also posts valid SAML assertions for administrating tenants. The idpUrl must point to the endpoint that automatically posts a SAML assertion to Visier. The session connection timeout limit is 5 seconds. If a session isn't connected in 5 seconds, the user sees a message. This enables the user to manually validate themselves against your IdP and establish a session with Visier using a popup window. |
string | Optional | ||
|
requestTimeout
|
The amount of time in milliseconds that Visier will wait while processing a request before stopping the request. If the default timeout of 10000 milliseconds (10 seconds) is too short, use this field to define a longer timeout time. |
number |
Optional |
Default is timeout after 10000 milliseconds. |
|
|
startSession |
If true, the API authenticates immediately in the bootstrap call. |
Boolean |
Optional |
Default is false. |
|
Understand session management
To run an embedded Visier application, Visier's API authenticates your users as Visier users. Your IdP must be set up to return a Security Assertion Markup Language (SAML) assertion that provides authentication certificates, your SAML assertion issuer, user information, and defines session duration. For more information, see SAML assertion parameters.
To authenticate users, the API creates a session and provides APIs to keep the session alive or to clean up the session. Visier uses dynamic session handling to manage session expiration and renewals. By default, the session renewal window is 55 minutes. This means that a session will not timeout if there has been any server activity in the last 55 minutes.
By default, the maximum session duration is 12 hours. As long as the user is active, Visier renews their session up to a maximum of 12 hours. You may choose to override this duration by setting the SessionNotOnOrAfter attribute on the SAML assertion.
Tip: Visier recommends that you set SessionNotOnOrAfter to be greater than your own session timeout to ensure that the maximum validity of the Visier session is longer than yours.
You can manage session validity in Studio in the following ways:
- You can change the idle timeout duration.
- If the
SessionNotOnOrAfterattribute is not provided through your IdP, you can set the maximum session length duration. For more information, see Set Up Session Validity.
To ensure that the Visier session does not expire before the max validity while the user is active in your application, you can periodically call visier("trigger", "PARENT_SESSION_ALIVE"). For more information, see User is active in your application but not in Visier.
If the Visier session does expire, your app can send a new SAML assertion without reloading the entire Visier solution to renew the session. For more information, see Handle session alignment.
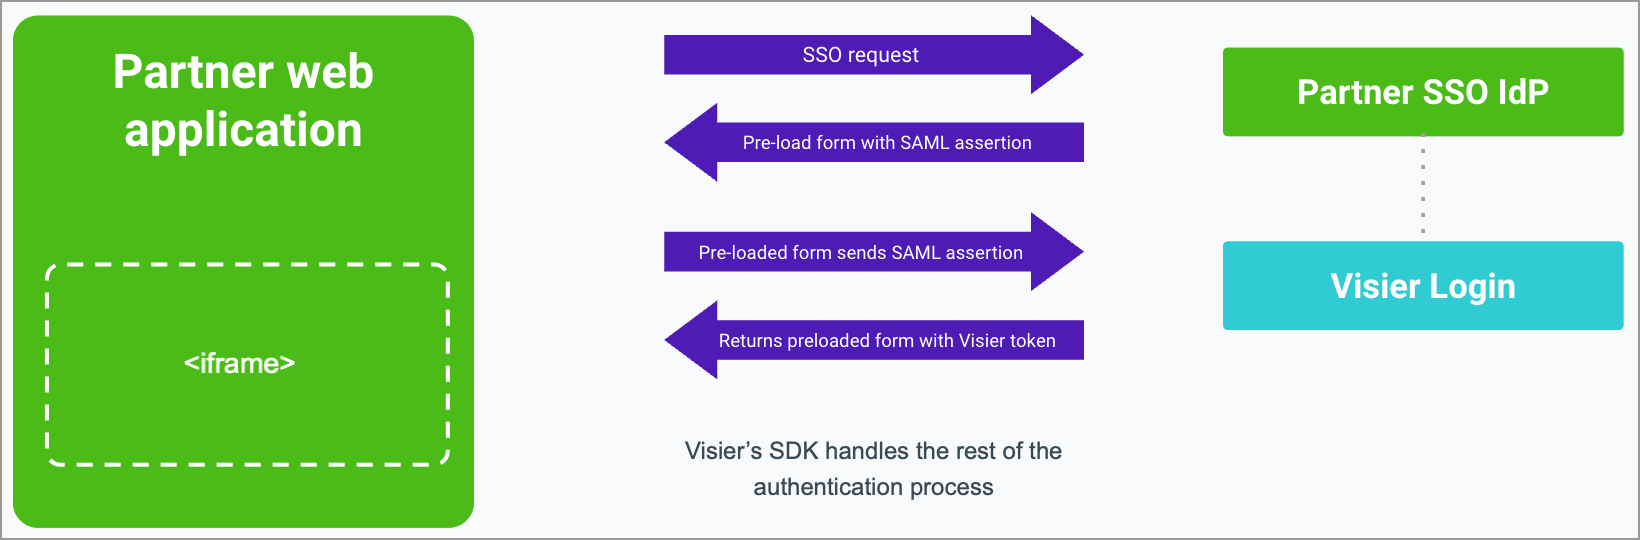
The embedding SDK adds an iframe that points to the idpUrl set in the visierConfig. The SAML workflow follows this process:
- The iframe sends an SSO request to the IdP.
- The IdP returns a pre-loaded form with a SAML assertion to the iframe. The form should contain code that submits the form without any user interaction.
- The form sends a request with the SAML assertion to Visier's login portal.
- Visier's login portal returns a pre-loaded form with the Visier token to the iframe.
- The SDK handles the rest of the authentication process using the token and service workers.
The following diagram illustrates the above process.
SAML assertion parameters
| Parameter | Description | Type | Required |
|---|---|---|---|
| X509Certificate | A digital document that securely associates a key pair with your identity. This certificate authenticates your session. | string | Required |
| Issuer | The SAML assertion's issuer, such as your IdP URL. | string | Required |
| nameID | The tenant user's username within Visier's system, such as a unique email address associated with a user. For example, 12345.WFF_j1r~c7o@jupiter.com. | string | Required |
| userEmail | The tenant user's email address within Visier's system. This is the user's preferred email address for receiving email content from Visier. For example, jane@callisto.com. | string | Required |
| displayName | The user's full name.
If the displayName is not specified,
the nameID is used. |
string | Optional |
| tenantCode | The tenant code within Visier’s system. For example, WFF_j1r~c7o. | string | Required |
| Recipient |
Visier's SSO endpoint URL. https://{vanity-name}.visier.com/VServer/auth/authenticateWithSaml |
string | Required |
| Audience |
Visier's SSO endpoint URL. https://{vanity-name}.visier.com/VServer/auth/authenticateWithSaml |
string | Required |
| SessionNotOnOrAfter | A timestamp defining the maximum validity of a Visier session. | string | Optional |
| locale |
The tenant user's preferred locale in the IETF BCP 47 language tag format. If specified, the locale attribute value is resolved to a locale supported by Visier and stored in the user’s preferences. This overrides any existing language preference that the user may have selected. If you enter an unsupported locale, Visier's default locale is en. For example, if you enter the unsupported locale If you enter a detailed locale variant like Supported locales:
|
string | Optional |
<samlp:Response xmlns:samlp="urn:oasis:names:tc:SAML:2.0:protocol" ID="_8b1ef66dd37707261b2e" Version="2.0" IssueInstant="2018-08-30T23:46:52Z" Destination="http://jupiter.visier.com/VServer/auth/authenticateWithSaml">
   <saml:Issuer xmlns:saml="urn:oasis:names:tc:SAML:2.0:assertion">
       https://jupiter.idp.com
   </saml:Issuer>
   <samlp:Status>
       <samlp:StatusCode Value="urn:oasis:names:tc:SAML:2.0:status:Success"/>
   </samlp:Status>
   <saml:Assertion xmlns:saml="urn:oasis:names:tc:SAML:2.0:assertion" Version="2.0" ID="_SI3PNv7Cat4fBASmwqdCHpgtRj4QtLfT" IssueInstant="2018-08-30T23:46:52.922Z">
       <ds:Signature xmlns:ds="http://www.w3.org/2000/09/xmldsig#">
           <ds:SignedInfo>
               <ds:CanonicalizationMethod Algorithm="http://www.w3.org/2001/10/xml-exc-c14n#"/>
               <ds:SignatureMethod Algorithm="http://www.w3.org/2001/04/xmldsig-more#rsa-sha256"/>
               <ds:Reference URI="#_SI3PNv7Cat4fBASmwqdCHpgtRj4QtLfT">
                   <ds:Transforms>
                       <ds:Transform Algorithm="http://www.w3.org/2000/09/xmldsig#enveloped-signature"/>
                       <ds:Transform Algorithm="http://www.w3.org/2001/10/xml-exc-c14n#"/>
                   </ds:Transforms>
                   <ds:DigestMethod Algorithm="http://www.w3.org/2001/04/xmlenc#sha256"/>
                   <ds:DigestValue>
                       BOzuMvpBUGbnhp+JfygodVx5aX1Jmvi5P7jphZV36e8=
                   </ds:DigestValue>
               </ds:Reference>
           </ds:SignedInfo>
           <ds:SignatureValue>
               a/4DP6QkBv1YIz71JeghbX12I6ba+pl7BHUyRzP80Lwu2BBYrgWbCDrtzaS113HIkYkpD01qnyh4+/OMdBjMJkL61h/Z6ZrjNCi4QfMx2B1M2+XNiQGMvWygZdIuOzxOvJD1/xGqs82444+7l9j1xo0gIqRGMhwnKTVP5gPUUPvPNQzPosxzxSH64J0wXd87pVkkLSE/iK5AXooATsPYxwSd4rBKuxLg29SDyW3lnHr5dSoKmSsgVWbj4bUDGbK0gprRu0LwEiKnvqv8VJU/2sGSFucWT6n5N7SGHEuIIpVl81my7jIbc6vk5Vf6SEaQkbpKZE9cm95OOjRX6OuzAA==
           </ds:SignatureValue>
           <ds:KeyInfo>
               <ds:X509Data>
                   <ds:X509Certificate>
                       MIIC+jCCAeICCQCCGzRFLDFnaDANBgkqhkiG9w0BAQUFADA/MQswCQYDVQQGEwJDQTELMAkGA1UECAwCQkMxEjAQBgNVBAcMCVZhbmNvdXZlcjEPMA0GA1UECgwGVmlzaWVyMB4XDTE4MDYwOTA2NDcyN1oXDTE5MDYwOTA2NDcyN1owPzELMAkGA1UEBhMCQ0ExCzAJBgNVBAgMAkJDMRIwEAYDVQQHDAlWYW5jb3V2ZXIxDzANBgNVBAoMBlZpc2llcjCCASIwDQYJKoZIhvcNAQEBBQADggEPADCCAQoCggEBAKqeZZXPkZgRpkLLoFzO1FosFctYsDTqKy6qsdp8DFJg25ulO/uFFR+pibyitcRRUgCxE7QS9O1MO9KVSGnMEFYBQApx02nYKOpZdnvYkjBdAZknVx/+5S/mBZ5ywHS77oWyvEjCvIpXonc9q8Az+PcTsTRmmhkICXqHF5PJltmeTv4nq8hIpaajMTZdvAjfxFOc/b1eAfdYrH9eQxY1GllTv/JhuVfP1fY5p3CpAyWun365rWNNF+aTgIltf/qkvP6Fleug/az+kxonECZrWm9ryZbXHnkJblds1Z0FIxOP2CPdIkh1Plo3TtE60AnTeSyMJTGl2F0ttGTL3fN6uxECAwEAATANBgkqhkiG9w0BAQUFAAOCAQEAYnk353ZXG/5ElowpjAMoCddU/yl9WxqMmNPnVY+t6xYbq6Mg6P7deLQ1vw2uTi1KgRFUUklamAwhLMqrHMJnWMNTZmlOsaVlH81P6dwtqxyI7nttpDVK0sLGRP3j0TnzTyPMyqFdXAiSJULVJwLCdIQAz7NInsWKYp+nzLc9a7ve1fgSPkhrrpDoddhWoSniatbI9iHJ+/fr0XOghk9yMzQF0kvmtkKGKpdZbpMYerBT+lZ9zIY+B6vomFva0lhKdRSvd8wsIa8MMUycI4oZDSRvbzfPHlwXMiE0mB3vMFdfIBEuw9xMvnk6wMb89fj8sxMDckB9TuLu1jX4LqHvNA==
                   </ds:X509Certificate>
               </ds:X509Data>
           </ds:KeyInfo>
       </ds:Signature>
       <saml:Issuer>
           https://jupiter.idp.com
       </saml:Issuer>
       <saml:Subject>
           <saml:NameID Format="urn:oasis:names:tc:SAML:1.1:nameid-format:emailAddress">
               ceo@jupiter.com
           </saml:NameID>
           <saml:SubjectConfirmation Method="urn:oasis:names:tc:SAML:2.0:cm:bearer">
               <saml:SubjectConfirmationData NotOnOrAfter="2018-08-31T00:46:52.922Z" Recipient="http://jupiter.visier.com/VServer/auth/authenticateWithSaml"/>
           </saml:SubjectConfirmation>
       </saml:Subject>
       <saml:Conditions NotBefore="2018-08-30T23:46:52.922Z" NotOnOrAfter="2018-08-31T00:46:52.922Z">
           <saml:AudienceRestriction>
               <saml:Audience>
                   http://jupiter.visier.com/VServer/auth/authenticateWithSaml
               </saml:Audience>
           </saml:AudienceRestriction>
       </saml:Conditions>
       <saml:AuthnStatement AuthnInstant="2018-08-30T23:46:52.922Z" SessionNotOnOrAfter="2018-08-31 T23:46:52.922Z" SessionIndex="614491951">
           <saml:AuthnContext>
               <saml:AuthnContextClassRef>
                   urn:oasis:names:tc:SAML:2.0:ac:classes:PasswordProtectedTransport
               </saml:AuthnContextClassRef>
           </saml:AuthnContext>
       </saml:AuthnStatement>
        <saml:AttributeStatement xmlns:xs="http://www.w3.org/2001/XMLSchema"        xmlns:xsi="http://www.w3.org/2001/XMLSchema-instance">
            <saml:Attribute Name="tenantCode"           NameFormat="urn:oasis:names:tc:SAML:2.0:attrname-format:basic">
               <saml:AttributeValue xsi:type="xs:string">WFF_j1r~c7o</saml:AttributeValue>
           </saml:Attribute>
            <saml:Attribute Name="userEmail"           NameFormat="urn:oasis:names:tc:SAML:2.0:attrname-format:basic">
               <saml:AttributeValue xsi:type="xs:string">jane@callisto.com</saml:AttributeValue>
           </saml:Attribute>
            <saml:Attribute Name="locale"           NameFormat="urn:oasis:names:tc:SAML:2.0:attrname-format:basic">
               <saml:AttributeValue xsi:type="xs:string">de</saml:AttributeValue>
           </saml:Attribute>
       </saml:AttributeStatement>
   </saml:Assertion>
</samlp:Response>
Step Two: Add an iframe to your target page
On the page in which you want to embed the Visier application, add an iframe and give the iframe an ID. The Visier application is embedded in your application through the iframe. The iframe's ID is the string you pass for visier-container to load Visier in your application. You can optionally embed multiple full application iframes on the same page, such as to embed Guidebooks in one iframe and Vee in a different iframe. For more information, see Load the Visier application in your iframe.
Step Three: Render Visier in your application
After getting a valid Visier session, you can then render Visier in your application. First, you need to retrieve the available Visier rooms for the navigation bar and then render the associated Visier navigation links in your application.
Fetch navigation links
To render Visier rooms, you must first retrieve links for each navigation item. visier("get", "APPLICATION_SECTIONS").
{
  "availableSections": [
    {
      "sectionId": "analytics",
      "sectionName": "Analytics",
      "sectionUrl": "https://visier-app-server/hr/prod/appcontainer#/analytics",
      "availableRooms": [
        {
          "roomId": "guidebook",
          "roomName": "Guidebook",
          "roomUrl": "https://visier-app-server/hr/prod/appcontainer#/analytics/guidebook"
        },
        {
          "roomId": "explore",
          "roomName": "Explore",
          "roomUrl": "https://visier-app-server/hr/prod/appcontainer#/analytics/explore"
        },
        {
          "roomId": "myCaptures",
          "roomName": "Captures",
          "roomUrl": "https://visier-app-server/hr/prod/appcontainer#/analytics/mycaptures"
        },
        {
          "roomId": "myAnalyses",
          "roomName": "Analyses",
          "roomUrl": "https://visier-app-server/hr/prod/appcontainer#/analytics/myanalyses"
        },
        {
          "roomId": "compare",
          "roomName": "Compare",
          "roomUrl": "https://visier-app-server/hr/prod/appcontainer#/analytics/compare"
        },
        {
          "roomId": "search",
          "roomName": "Search",
          "roomUrl": "https://visier-app-server/hr/prod/appcontainer#/analytics/search"
        }
      ]
    },
    {
      "sectionId": "admin",
      "sectionName": "Admin",
      "sectionUrl": "https://visier-app-server/hr/prod/appcontainer#/admin",
      "availableRooms": [
        {
          "roomId": "security",
          "roomName": "Security",
          "roomUrl": "https://visier-app-server/hr/prod/appcontainer#/admin/security"
        },
        {
          "roomId": "configuration",
          "roomName": "Configuration",
          "roomUrl": "https://visier-app-server/hr/prod/appcontainer#/admin/configuration"
        },
        {
          "roomId": "settings",
          "roomName": "Settings",
          "roomUrl": "https://visier-app-server/hr/prod/appcontainer#/admin/settings"
        },
        {
          "roomId": "versioning",
          "roomName": "Versions",
          "roomUrl": "https://visier-app-server/hr/prod/appcontainer#/admin/versioning"
        },
        {
          "roomId": "solutionDefinition",
          "roomName": "Solution Definition",
          "roomUrl": "https://visier-app-server/hr/prod/appcontainer#/admin/solutionDefinition"
        }
      ]
    }
  ]
}
Render navigation links
After fetching the available Visier rooms (application sections), you might want to add links to Visier rooms in your application's navigation bar. The following code sample is an example of how to render Visier links on your navigation bar.
// Add all the rooms from a given list of rooms.
function addRoomsFromVisierSection(rooms) {
   if (rooms) {
       rooms.forEach(function (room, i) {
           addVisierMenu(room.roomId, room.roomName, room.roomUrl, "room");
       })
    }
}
Direct navigation to Visier iframe
When a user selects a Visier room on your navigation bar, your code should trigger navigation to the iframe.
visier("trigger", "NAVIGATE", selectedUrl, visier-container);Note: If you have multiple iframes, specify visier-container; for example, visier("trigger", "NAVIGATE", selectedUrl, visier-container1);. If the page has one iframe, you can omit visier-container.
Load the Visier application in your iframe
On your target page, call one of the following:
-
visier("embedApp", "visier-container"). This loads Visier on the target page in the specified iframe. The landing page defaults to the Visier default. visier("embedApp", "visier-container", landingUrl). In addition to loading Visier in the specified iframe, this also allows you to specify a specific Visier room as the landing page.
Note: You can optionally embed multiple full application iframes on the same page, such as to embed Guidebooks in one iframe and Vee in a different iframe. To use multiple iframes, add additional containers; for example:
visier("embedApp", "visier-container1", <landing page 1 URL>);
visier("embedApp", "visier-container2", <landing page 2 URL>);
(Optional) Implement breadcrumb navigation
Instead of using Visier's native breadcrumbs and page titles, you can construct your own breadcrumbs from the navigate event message. For more information about the navigate event, see Step Six: Set up event handling/listeners.
Step One: Configure the embedApp call
In the embedApp call, provide the following values:
-
hideNavigation: true: Hides navigation buttons and links in Visier pages, such as back buttons and built-in breadcrumbs. -
navigateNotificationMode: "BREADCRUMB_PARENT_HIERARCHY": Instructs Visier People to include breadcrumb-related information in theNAVIGATE_INTERNALmessages to your application.
app.embedApp(visierContainerid, initialUrl, maxRetry, {
    hideNavigation: true,
    navigateNotificationMode: "BREADCRUMB_PARENT_HIERARCHY",
});
Step Two: Handle navigate event messages
When a user navigates to a Visier page within the embedded application, the navigate event triggers. The event's message contains information you need to build breadcrumb navigation and display page titles and descriptions in your application.
We recommend that you register the navigate events listener within the callback of the bootstrap call before calling embedApp.
visier("bootstrap", visierConfig, async function(app) {
    app.on("navigate", function(msg) {
      // handle "msg"
    };
    // subscribe to other events, etc.
});
In the above sample code, the msg argument of the navigate listener function is an object with the following properties:
-
code: EitherNAVIGATE_EXTERNALorNAVIGATE_INTERNAL. -
message: An object containing the payload. Its format depends on the code.
Caution: The Visier People and Compensation Benchmarks navigate events are independent. Your application code must listen to the events of the correct SDKs:
-
When embedding Visier People pages, listen to the
navigateevents of/assets/embedded/webAssets/sdk.v2.js. -
When embedding Compensation Benchmarks pages, listen to the
navigateevents of/assets/sdk.js; -
When embedding both, listen to
navigateevents from both of the above SDKs.
If the Compensation Benchmarks UI opens an analysis, your application receives the following messages:
-
NAVIGATE_EXTERNALfrom/assets/sdk-manager.js: A Compensation Benchmarks page is opening a Visier People page. This isn't relevant for breadcrumb navigation. -
NAVIGATE_INTERNALfrom/assets/sdk-manager.js: Information about the analysis whose parent is a Compensation Benchmarks page. -
NAVIGATE_INTERNALfrom the/assets/embedded/webAssets/sdk.v2.js: The parent Analyses page.
If the current page belongs to Compensation Benchmarks, we recommend that your application code ignores NAVIGATE_INTERNAL messages from sdk.v2.js because sdk.v2.js is for Visier People, not Compensation Benchmarks.
Step Three: Trigger a NAVIGATE call if a user clicks a breadcrumb item
When you construct breadcrumbs to display in your UI, store the navigation item's url value obtained from parentHierarchy. When a user clicks a breadcrumb that corresponds to a Visier page, trigger a NAVIGATE call on the embedding SDK and provide the corresponding url value.
Warning: Do not modify the URLs before sending them to the SDK's NAVIGATE calls.
When embedding Visier People, trigger NAVIGATE using /assets/embedded/webAssets/sdk.v2.js.
When embedding Compensation Benchmarks, trigger NAVIGATE using /assets/sdk.js;
When embedding both, trigger NAVIGATE using /assets/sdk-manager.js. The SDK manager handles the difference and relays the message to the correct Visier application.
(Optional) Override page titles
If you'd rather use your own page titles than Visier's native page titles, use the pageId returned by NAVIGATE_INTERNAL.
function getPageTitle(data) {
    if (data.pageId === "guidebooks") {
        return "Analytic Topics";
    }
    return data.title;
}
You can then call data to get the page title text and the breadcrumb items text when traversing the parentHierarchy array.
Static and dynamic page IDs
Some Visier pages have static page IDs that are hard-coded, whereas other page IDs are dynamic that come from database content.
Static page IDs are safe to hard-code in your embedding code. Dynamic page IDs may change without notice; do not hard-code in your embedding code.
The following list includes all static pages in Visier People.
-
analyses
-
compare
-
explore
-
guidebooks
-
reports
-
search
-
vee
The following list includes all static pages in Compensation Benchmarks.
-
bulk-match
-
compare-to-market
-
current-jobs
-
explore-market-alignment-analysis
-
home
-
learn-more
-
market-data-for-new-jobs
-
match-jobs
-
research-job-change
-
research-persons-pay
-
select-benchmark-job
-
view-details
Any pages not included in the previous lists are dynamic.
Step Four: Handle Visier sessions in your application
When one of your users interacts with the embedded Visier application, there is a session in your application and a session in the Visier application. Your code should handle session alignment between your application and Visier, as well as any session exceptions that may occur.
Handle session alignment
It's important to properly handle sessions between your application and Visier. There are some cases that require alignment between your application and Visier, including:
- The user is active in Visier but not in your application.
- The user is active in your application but not in Visier.
- The Visier session expired.
Note: Usernames are unique identifiers and must be unique across all tenants. Different usernames can use the same email address.
User is active in Visier but not in your application
By default, the API continues to emit a VISIER_SESSION_ALIVE message every five (5) minutes. This message contains a timestamp of the user's last activity in the Visier application. To provide a positive user experience, we recommend that your application listens for this message and acts appropriately.
To change the frequency of the VISIER_SESSION_ALIVE message:
- Sign in to Visier.
- Navigate to Studio.
- On the global navigation bar, click Settings > Embedded App Config.
- Type a number in minutes. This specifies how frequently Visier emits the
VISIER_SESSION_ALIVEmessage. - When finished, click Save.
visier("on", "session", function (msg) {
    switch (msg?.code) {
        case "VISIER_SESSION_ALIVE":
            handleVisierSessionAliveEvent(visierMessage);
            break;
        default:
    }
});
User is active in your application but not in Visier
Given that Visier sessions remain active as long as there is some server activity in the previous 55 minutes, you can choose to trigger a message through Visier's API: visier("trigger", "PARENT_SESSION_ALIVE"). This triggers a request to the Visier server in the background to ensure the session is renewed if needed. As the renewal window for a Visier session is 55 minutes, we recommend triggering this message every 10 to 15 minutes.
Note: Always clear the interval when ending your session with Visier.
<iframe id="visier" src="<visierRoomUrl>" frameborder="0"></iframe>
// Post a parent session alive message to Visier using the API at provided intervals.
function keepVisierSessionAlive() {
    var timer = setInterval(function() {
        visier("trigger", "PARENT_SESSION_ALIVE");
    }, 600000); // 10 minute interval. }

// Clear the interval at some point, ideally when the session expires or when closing the session.
clearInterval(timer);
Visier session expired
When the Visier session expires, the API emits a VISIER_SESSION_EXPIRED message. You can then choose to either renew the session by calling embedApp or get for APPLICATION_SECTIONS again, or take any other appropriate action to ensure a smooth user experience.
function handleVisierSessionExpiration(message) {
   // Add code for how you would like to handle this.
   // For example, here we show an error message and then embed the app again to set up a new session
   $("#error").show().delay(5000).fadeOut();
   visier("embedApp", "visier-container");
}

visier("on", "session", function (msg) {
    switch (msg?.code?.toUpperCase()) {
        case "VISIER_SESSION_EXPIRED":
            handleVisierSessionExpiration(visierMessage);
            break;
        default:
    }
});
Handle session exceptions
Some exceptions exist for sessions, such as when a user logs out from your application while loading a Visier session. These exceptions are handled individually, including:
- User logout from your application.
- Visier solution is down for maintenance.
- Authentication/SSO error occurred.
User logout from your application
Your application should send a PARENT_SESSION_CLEANUP message through the API's trigger method. The API will clean up the Visier session.
Visier solution is down for maintenance
The API emits a VISIER_APP_DOWN message in the event that any maintenance is being performed. Ensure that your application listens for this message and acts appropriately.
{
    "code": "VISIER_APP_DOWN",
    "message": "Application servers are locked for upgrading to a new version"
}
Authentication/SSO error occurred
In case of unsuccessful user login or incorrect SSO set up, API emits a message with details about the error that occurred. All authentication and SSO errors are communicated with the SESSION_ERROR message.
These errors must be handled with care as they may block user workflows. Examples of scenarios in which this error may be thrown include, but are not limited to, missing or expired certificates, disabled SSO, usernames not found, and invalid tenant codes.
For support, please contact Visier.
{
    "code": "SESSION_ERROR",
    "message": "Wrong username or password. Please try again."
}
Handle multi-tenant sessions
For users that have access to multiple tenants in Visier, we recommend using a single tab to access tenants. If you want to access a second tenant, we recommend that you remove the old iframe and create a new one to load the new tenant into.
Note: If you choose to use multiple tabs, your code should clean up any prior tabs for different users so that multiple tabs can't be used simultaneously.
To handle multi-tenant sessions, set up your embedding code so that the following procedure occurs:
- The previous user or tenant session is cleaned up before a new session is created for a different user or tenant.
-
The tab containing the previous user or tenant session receives an
EJECT_SESSIONsession message through the Visieronmethod. When the tab receives this message, your code must remove or clear the Visier app iframe or Visier chart containers. This prevents the embedded content for this user from being used further.Caution: If using multiple tabs and
EJECT_SESSIONisn't implemented, further interactions with the embedded content in prior tabs will pick up the authentication tokens for the new user and erroneously start showing content for the new user.CopySample codevisier.on("session", function (msg) {
if (msg.code === "EJECT_SESSION") {
showSessionEndedMessage();
document.body.removeChild(document.getElementById("visier-app"));
}
}); - After clean up succeeds, the new tab continues to set up and load the embedded content for the new user.
- If clean up fails, the new tab receives a
FAILED_TO_EJECT_PREVIOUS_SESSIONerror message through the Visieronmethod and fails to load the embedded content.
Step Five: Redirect users into your application
Visier has several features that allow a user to click on a hyperlink that redirects the user into the full application, such as analysis sharing, email push, and embedded visuals. To ensure that these features redirect users back into your app within the Visier iframe, you must configure a click-through link in Visier.
Note: If there is no Visier session already established for the user, the user is first redirected to your app's login page for authentication before they are redirected to the analysis within the iframe.
To configure the click-through link:
- Sign in to Visier and navigate to Studio.
- On the global navigation bar, click Projects.
- Open or create a project.
- Navigate to Model > Settings > Navigation, Notices & Links.
- Enable the Click-through link toggle.
- Enter the URL that hosts the Visier iframe in your app.
- Publish your changes to production to use the click-through link in subsequent analysis links and emails sent by Visier.
Caution: If the click-through link is disabled, your users cannot be redirected to your app even if the link is set with the correct value.
When your application is loaded, it should search for the analysis_url query parameter in the URL. If this query parameter is present, your application should do the following:
- Get the encoded analysis URL.
- Call
embedAppor navigate with the iframe container name and the analysis URL.
const params = new URLSearchParams(window.location.search);
const analysisUrl = params.get("analysis_url");
if (analysisUrl) {
  visier("trigger", "NAVIGATE", analysisUrl);
}
You can do one of the following to configure the URL:
- Use one URL across customers: Allows you to set a base URL to redirect all customers to. When a user clicks a visualization, they are redirected to the set URL. The visual also appends the analysis ID which can be passed to the Visier iframe to land on.
- Handle customer-specific URLs: Allows you to pass in the customer URL as a config option on the visualization. The visual also appends the analysis ID which can be passed to the Visier iframe to land on.
Step Six: Set up event handling/listeners
The embedding API exposes a number of events that can be used for custom event handlers, which can be added right after calling the bootstrap method. Visier also recommends adding a listener for the error event so that you may take action if the chart or analysis is not working as expected.
Events
Info event type
Info is an informational event, such as if the visualization is rendered. The following table defines the possible info messages.
| Message | Description |
|---|---|
| EMBEDDED_CHART_READY_FOR_FILTERS | The embedded chart is ready to accept dynamic context filters. |
|
EMBEDDED_CHART_RENDERED |
The embedded chart has finished rendering. |
|
VISIER_APP_LOADED |
The embedded application loaded successfully. You can use this event to keep track of whether the app is already loaded to prevent loading more than once. |
Error event type
Error is an error event for failures that prevent the app or embedded visualization from continuing, such as incorrect configurations. The following table defines the possible error messages.
| Message | Description |
Applicable To |
|---|---|---|
| CANNOT_FIND_ANALYSIS | The given analysis could not be found. The ID may be invalid, it may have been deleted, or the user does not have access. |
Embedded visualizations only |
| CANNOT_FIND_CONTENT | Could not find a valid visual in the provided analysis for embedding. |
Embedded visualizations only |
|
CHART_DATA_ERROR |
Chart data was not present or incorrect type was found. |
Embedded visualizations only |
|
CONFIG_INVALID |
Chart config is invalid. The chart field in the config should be an array of objects. |
Embedded visualizations only |
|
CONTAINER_MISSING |
The container to embed the content in cannot be found. |
Embedded application or embedded visualizations |
|
FILTERS_NOT_DEFINED |
No filters were defined when invoking dynamic filters. |
Embedded visualizations only |
|
INVALID_APP_URL |
Either an invalid URL was passed to the |
Embedded application only |
|
INVALID_COMMAND |
Cannot embed content. Feature flag disabled. |
Embedded application or embedded visualizations |
|
INVALID_FILTER_MEMBER |
No driving analytic object found. |
Embedded visualizations only |
|
SW_LOADING_TIMEOUT |
These timeout errors emit if there are unexpected issues with the authentication set up or if the set up took longer than expected, such as due to network latency. Possible causes include:
|
Embedded application or embedded visualizations |
|
UNSUPPORTED_FILTER_TYPE |
An invalid filter was found. The filter syntax may be incorrect. |
Embedded visualizations only |
|
VISIER_APP_DOWN |
When Visier is unavailable, render and log an error message. |
Embedded application or embedded visualizations |
Session event type
Session is an event that is emitted during stages of session management, such as when the platform is attempting to establish a session. The following table defines the possible session messages.
| Message | Description |
|---|---|
| AUTO_LOGIN_FAILED |
Failed to authenticate the user. Scenarios in which this message may be emitted include, but are not limited to:
|
| SESSION_ERROR |
Represents a blocked user flow. Scenarios in which this message may be emitted include, but are not limited to:
|
|
SESSION_ESTABLISHED |
This message is emitted once an authenticated session has been established with Visier for the current user. We recommend starting a background process to keep the Visier session alive on a regular interval after the session has been established. |
|
USER_AUTO_PROVISION_FAILED |
Represents a blocked user flow. The user doesn't exist in Visier and a new Visier user couldn't be created for the current user. Auto provisioning must be enabled. For more information, refer to the message. |
|
USER_AUTO_PROVISION_SUCCESS |
This message is emitted when a new Visier user is created automatically for the current user. Auto provisioning must be enabled in your Visier tenant and it must be the first time this user is using Visier. |
|
VISIER_SESSION_ALIVE |
These events are emitted when the user is active in the Visier application. This allows the parent application to keep its own user session alive when the user is active in Visier but not in the parent application. By default, these messages are emitted once every five minutes, but this can be configured in your Visier tenant under Embedded App Config. |
|
VISIER_SESSION_EXPIRED |
If the user is active in the parent application but not in Visier, the user's session in Visier can expire. Note: Sending the Visier application iframe To create a new session in the background, call Alternatively, call |
Debug event type
Debug is an event that emits debugging information, including a unique code and time stamp for when the event occurred.
A majority of Visier's embedding logic occurs in the web client, unseen and untracked. You can use debug events to facilitate the debugging process with Visier. If you encounter unexpected errors that you can't resolve, you can reproduce the issue with these debug events logged to your browser Console and then share a copy of the Console logs with Visier Technical Support. You can optionally share the the HAR file from the Network tab as well.
Navigate event type
Navigate is an event that emits internal and external routing information, such as if a user navigates from Guidebooks to Analyses. The following table defines the possible navigate messages.
| Message | Description |
|---|---|
| NAVIGATE_EXTERNAL |
Indicates navigation from one application to another.
|
|
NAVIGATE_INTERNAL |
Indicates navigation within Visier; for example, from Guidebooks to Analyses.
NAVIGATE_INTERNAL supports breadcrumb information for all pages in Compensation Benchmarks and the following Visier People pages:
|
{
  "code": "NAVIGATE_EXTERNAL",
  "message": {
    "url": "#/analytics/myanalyses/0550adf0-2995-4e6f-9f83-1f03a0ae6c54",
    "dest": "Visier"
  }
}{
"code": "NAVIGATE_INTERNAL",
"message": {
"url": "#/analytics/guidebook?guidebookId=Monitor_Your_Organization_Guidebook",
"pageId": "Monitor_Your_Organization_Guidebook",
"title": "Learn About Visier People",
"description": "Learn about best practices in using Visier and people analytics",
"parentHierarchy": [
{
"url": "#/analytics/guidebook",
"pageId": "guidebooks",
"title": "Guidebooks"
}
]
}
}Refresh event type
Refresh is an event that refreshes the Visier iframe when it is emitted. Send refresh events to refresh the embedded application within the iframe, not the entire browser page, such as to see non-versioned security changes. To use refresh events, implement an emitter using the following code sample.
visier("trigger", "REFRESH")Event handling sample
The following code sample provides an example for handling different messages emitted by Visier. For example, if the embedded application fails to auto provision a user, the iframe emits a message with the messageType: USER_AUTOPROVISION_FAILED.
// Add event handlers for session events
visier("on", "session", function(msg) {
    switch (msg?.code?.toUpperCase()) {
        case "SESSION_ERROR":
            handleSessionError(msg.message);
            break;
        case "SESSION_ESTABLISHED":
            handleSessionEstablished();
            break;
        case "USER_AUTO_PROVISION_FAILED":
            handleAutoprovisionFailure(msg.message);
            break;
        case "USER_AUTO_PROVISION_SUCCESS":
            handleAutoprovisionSuccess();
            break;
        case "VISIER_SESSION_ALIVE":
            handleVisierSessionAliveEvent();
            break;
        case "VISIER_SESSION_EXPIRED":
            handleVisierSessionExpired();
            break;
        default:
            console.log("Received session message from visier", msg);
            break;
    }
});
// Add event handlers for error events
visier("on", "error", function(msg) {
    switch (msg?.code) {
        case "CONFIG_INVALID":
            handleInvalidConfig();
            break;
        case "CONTAINER_MISSING":
            handleContainerMissing();
            break;
        case "FILTERS_NOT_DEFINED":
            handleFiltersNotDefined();
            break;
        case "CHART_DATA_ERROR":
            handleChartDataError();
            break;
        case "CANNOT_FIND_ANALYSIS":
            handleCannotFindAnalysis();
            break;
        case "CANNOT_FIND_CONTENT":
            handleCannotFindContent();
            break;
        case "INVALID_COMMAND":
            handleInvalidCommand();
            break;
        case "INVALID_FILTER_MEMBER":
            handleInvalidFilterMember();
            break;
        case "UNSUPPORTED_FILTER_TYPE":
            handleUnsupportedFilterType();
            break;
        case "INVALID_APP_URL":
            handleInvalidAppUrl();
            break;
        case "VISIER_APP_DOWN":
            handleVisierAppDownEvent(msg.message);
            break;
        default:
            console.log("Error:", msg);
            break;
    }
});
Step Seven: Set up uptime monitoring
We strongly recommend that you set up uptime monitoring as part of your UI integration. To enable uptime monitoring, give Visier a dummy user access in your production environment. This allows Visier to ping your production application every 15 minutes to spot any outage in a timely manner. Pinging your application enables 100% monitoring capabilities. Without this, Visier cannot accurately monitor uptime between both applications.
Troubleshooting
First, ensure that your program listeners properly handle events and messages that are returned. If your issue persists, see Technical FAQ for Embedded Partners.
If you cannot find answers on your own, please gather the following information before contacting Visier:
- Error messages
- RCI (the unique error code for each type of the errors)
- Reproduction steps
- Expected behavior and current behavior
- Time stamp
- Screenshots or screen recording
- Username or user ID, if applicable
- Request URL, header, and body, if applicable
The more information provided, the easier it is for Visier to troubleshoot. You can track the issue in the issue logs shared between yourself and Visier.
Content Security Policy (CSP) issues
Visier dynamically generates its frame-ancestors CSP directive based on the Referer and Origin headers sent during authentication. This ensures only allowed domains can embed the application.
In Visier's allowlist, subdomains matter, not paths. For example:
- <https://dev.example.com/visier> works if dev.example.com is on the allowlist.
- <https://prod.example.com/visier> fails unless prod.example.com is explicitly added to the allowlist.
Visier validates domains against the allowlist during authentication. Additionally, if headers are missing or unmatched, the CSP defaults to frame-ancestors 'self' for security.
When embedding Visier, the /authenticateWithSAML endpoint requires the following headers to dynamically generate the correct CSP:
- Referer: Set by the browser based on the parent page's URL.
- Origin: Determined by the parent page's domain and sandbox attributes.
Example: If your SDK is loaded in an iframe at <https://partner-site.com>, the browser sends Origin: <https://partner-site.com>. Visier checks <https://partner-site.com> against the allowlist and includes the domain in the CSP response.
Use the following checklist to avoid CSP issues:
- Confirm your domain is allowlisted in Visier. For more information, see Add Your Domain to the Embeddable Domains List.
- Ensure your server sets the correct
Referrer-Policyto send headers; for example,strict-origin-when-cross-originorno-referrer-when-downgrade. - In your sandbox attributes, avoid overly restrictive iframe settings that block headers; for example,
sandbox="allow-scripts".
If you receive the issue Refused to frame ... violates CSP directive "frame-ancestors 'self'", it may be due to:
- Missing Referer or Origin headers in the authentication request.
- Domain is not allowlisted or headers point to a non-allowlisted domain.
To resolve the issue, try:
- Use browser developer tools to check the headers sent during authentication.
- Validate your domain's allowlist status with Visier's support team.
Visier dynamically constructs CSP headers to avoid exposing allowlisted domains publicly. This prevents unauthorized users from discovering sensitive configuration details. By following these steps, you can ensure seamless embedding while maintaining security compliance. For further guidance, see MDN's Content Security Policy (CSP) documentation.
SDK file history
Review the latest changes to the sdk.v2.js file.
|
Last updated date |
Changes |
|---|---|
|
November 21, 2025 |
Added customization variables that control the font and colors in an analysis. For more information, see White Label Visier with the SDK. |
|
October 22, 2025 |
Added functional customization objects to control the display text and visibility of the Owned by me, Shared with me, and Published tabs in the Reports room. For more information, see Functional customization objects. |
|
August 6, 2025 |
Added support for customizing the appearance of the Reports room using the |
|
August 6, 2025 |
Added support for customizable navigation breadcrumbs. Instead of using Visier's native breadcrumbs and page titles, construct your own breadcrumbs from the |
|
April 16, 2025 |
New |
|
August 7, 2024 |
Added support for embedding multiple full application iframes on the same page. This change includes:
|
|
January 10, 2024 |
Because Google is deprecating third-party cookies, we updated sdk.js to sdk.v2.js. V2 ensures a more resilient integration framework by minimizing dependencies on browsers like Chrome. Failing to adopt these changes will result in users being unable to access analytics in Visier where you've embedded it in your applications. Google's grace period allows transitioning away from third-party cookies until June 30, 2024. This means you have until June 30, 2024 to transition to sdk.v2.js. |